
By Blue Dragon Racing
If PSI is the foundation of grip, camber determines how that grip meets the track.
Before you begin adjusting toe or caster, camber decides where and how the tire touches the road. In both sim racing and real GT3 competition, that contact patch influences almost everything the car does in a corner.
Camber is not simply another number in the setup menu. It determines whether the tire works with the car or fights against it.
What Is Camber?
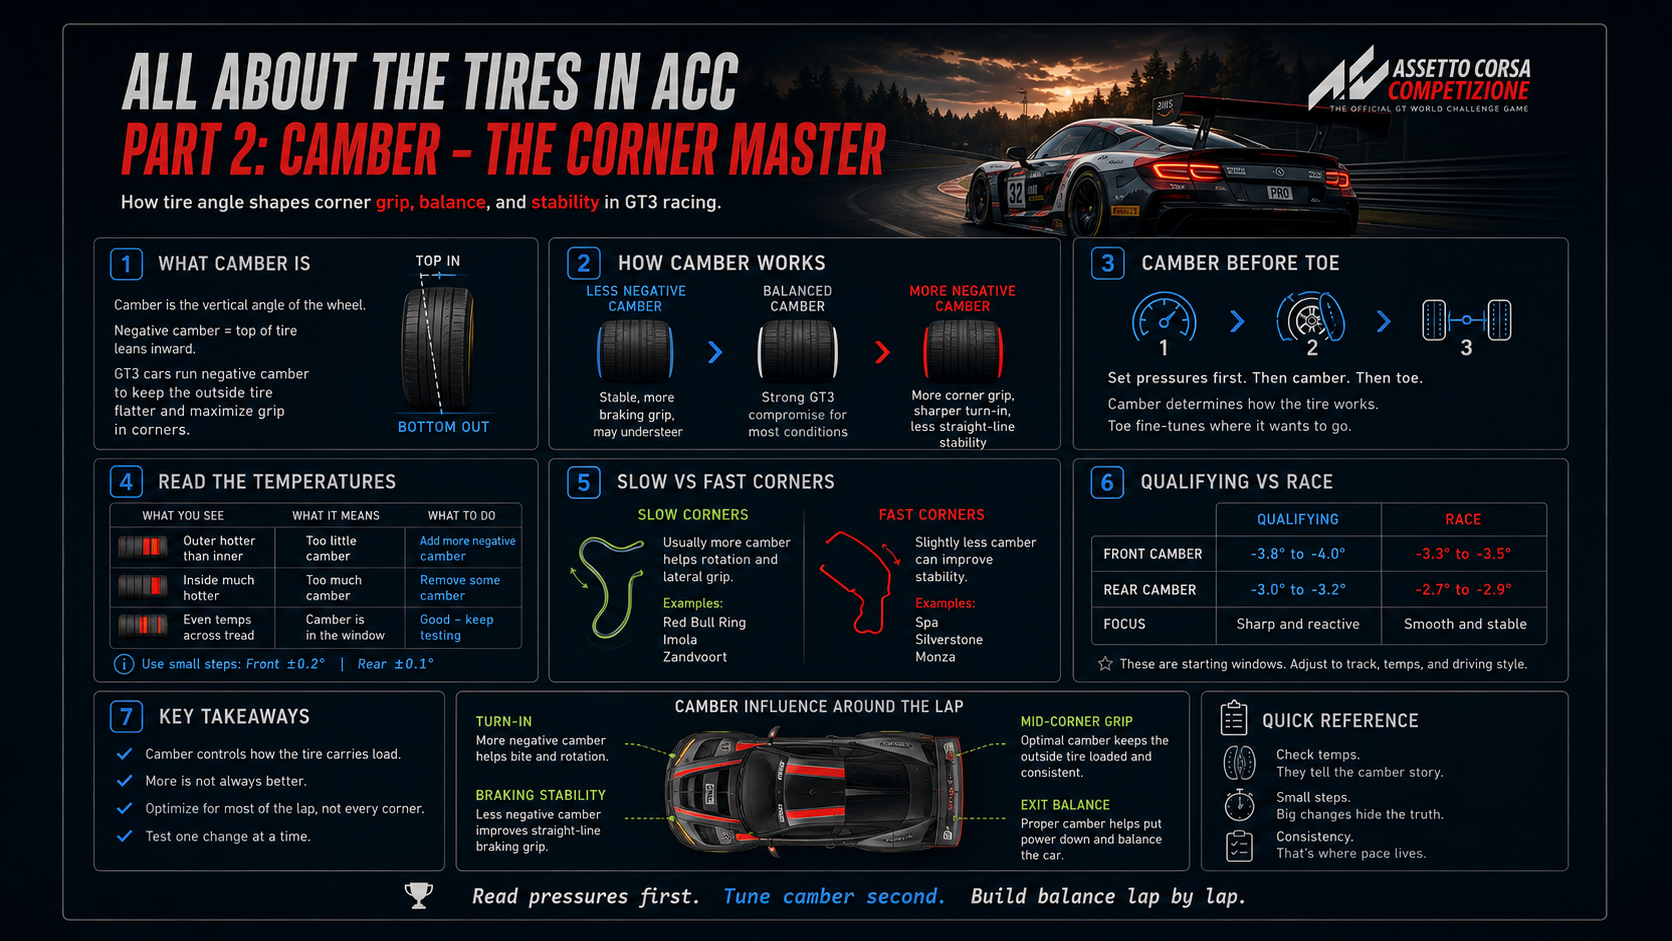
Camber is the angle of the wheel relative to vertical when viewed from the front or rear of the car.
Negative camber means the top of the tire leans inward.
Positive camber means the top of the tire leans outward. Positive camber is rarely used in circuit racing.
GT3 cars normally use negative camber because the body rolls and the suspension compresses during cornering. As the car leans onto the outside tires, negative camber helps keep the loaded tire flatter against the asphalt.
Think of it this way:
When the car leans, camber helps keep the contact patch alive.
Without enough negative camber, the car rolls onto the outside edge of the tire. With too much negative camber, the tire may work well under heavy cornering load but lose braking grip and straight-line stability.
The goal is not maximum camber.
The goal is the correct compromise.
How Camber Works
Camber changes the size and shape of the contact patch.
That small section of rubber determines whether the car holds the line or slides away from it.
| Camber | Contact on Straights | Contact in Corners | General Behaviour |
|---|---|---|---|
| –2.5° | Larger and more even | Outside edge may carry too much load | Stable, but may understeer |
| –3.2° | Balanced compromise | Strong contact under cornering load | Typical GT3 balance |
| –4.0° | More load on the inside edge | Strong lateral grip under heavy load | Sharp, but less stable in braking and on straights |
Less negative camber usually improves braking stability and straight-line grip.
More negative camber usually improves lateral grip and turn-in under cornering load.
Neither direction is automatically better.
The correct setting depends on the circuit, tire pressure, temperature, driving style and how much load the car generates.
Why Camber Comes Before Toe
Camber determines how the tire sits on the ground.
Toe determines the direction in which the tires point.
If you adjust toe first, you may be fine-tuning the direction of a tire that is not using its contact patch correctly.
That is why a sensible setup order is:
- Set tire pressures.
- Adjust camber.
- Fine-tune toe.
- Adjust caster if necessary.
Toe influences how the tire moves across the road.
Camber determines how effectively the tire works while doing it.
How to Read Camber Through Tire Temperatures
Camber should not be adjusted by guessing.
Once your tire pressures are stable, temperature distribution becomes one of the most useful indicators available.
ACC shows temperatures across the inside, middle and outside sections of each tire. These numbers help reveal whether the tire is working evenly under load.
The inside edge will normally be warmer than the outside edge because GT3 cars use negative camber. A small temperature difference is expected.
A very large difference may indicate excessive camber.
If the outside edge becomes hotter than the inside edge, the tire may not have enough negative camber for the load it is carrying.
| Feeling on Track | Likely Temperature Pattern | Possible Meaning | Suggested Change |
|---|---|---|---|
| Mid-corner understeer | Outside front hotter than inside | Too little front camber | Add approximately 0.2° more negative front camber |
| Nervous under braking | Inside front much hotter | Too much front camber | Reduce negative front camber by approximately 0.2° |
| Sluggish corner exit | Rear outside hotter than inside | Too little rear camber | Add approximately 0.1° more negative rear camber |
| Unstable corner exit | Rear inside much hotter | Too much rear camber | Reduce negative rear camber by approximately 0.1° |
These are starting points, not universal solutions.
A temperature difference may also be caused by tire pressure, toe, driving technique, track layout or repeated sliding. That is why pressure should be corrected first and only one setup value should be changed at a time.
A Practical Example
Imagine that you are driving at the Red Bull Ring.
The car pushes wide through Turn 3, and the outside section of the front tire is approximately seven degrees hotter than the inside section.
That suggests the loaded front tire may be rolling too far onto its outside edge.
Adding approximately 0.2 degrees of negative front camber may help the tire remain flatter under cornering load. The result may be stronger front bite and a more natural turn-in.
The order remains important:
First, correct the pressure.
Then, study the temperatures.
Only after that should you adjust camber.
Slow Corners and Fast Corners
Camber does not behave identically in every corner.
The ideal value depends on how the tire is being loaded.
Slow Corners
At lower speeds, mechanical grip is especially important.
The car may experience significant weight transfer without receiving much help from aerodynamic downforce. The outside tire must support the car while maintaining enough contact to rotate through the corner.
More negative camber can sometimes improve front bite and lateral grip in these conditions.
Examples include:
- Red Bull Ring, Turn 3
- Imola, Variante Alta
- Zandvoort, Turn 11 hairpin
A possible starting range might be:
- Front: –3.7° to –3.9°
- Rear: –3.0° to –3.2°
This can improve rotation, but it may also reduce braking stability and straight-line contact.
Fast Corners
At high speed, aerodynamic load helps keep the car more stable and compresses the suspension.
Too much negative camber may reduce the available contact patch on straights and under braking without providing a meaningful benefit.
Examples include:
- Spa-Francorchamps, Eau Rouge and Raidillon
- Silverstone, Copse and the Maggots-Becketts complex
- Monza, Curva Alboreto
A possible starting range might be:
- Front: –3.3° to –3.5°
- Rear: –2.7° to –3.0°
This generally provides better stability and a smoother aerodynamic balance.
These values should not be treated as guaranteed optimal settings. ACC physics, car models, tire versions and track conditions can change. Always test the car rather than relying only on a number.
Qualifying Camber Versus Race Camber
Qualifying and racing place different demands on the tires.
Qualifying Setup
In qualifying, the goal is usually maximum performance over a small number of laps.
You want immediate rotation and strong front-end response.
A qualifying setup may use more negative camber because tire longevity and long-term stability matter less.
A possible qualifying range could be:
- Front: –3.8° to –4.0°
- Rear: –3.0° to –3.2°
Advantages:
- Strong turn-in
- High peak lateral grip
- Responsive handling
Disadvantages:
- Higher inside-edge temperatures
- Faster wear
- Reduced braking stability
- Less consistent performance over a long stint
Race Setup
A race setup must remain predictable as the tires age, fuel burns away and track conditions change.
Slightly less negative camber may create a more stable contact patch and more even tire behaviour.
A possible race range could be:
- Front: –3.3° to –3.5°
- Rear: –2.7° to –2.9°
Advantages:
- More stable braking
- More even tire temperatures
- Improved tire life
- More predictable long-run balance
Disadvantages:
- Slightly slower initial response
- Less aggressive turn-in
- Potentially lower peak grip over one lap
| Mode | Front Camber | Rear Camber | General Behaviour |
|---|---|---|---|
| Qualifying | –3.8° to –4.0° | –3.0° to –3.2° | Sharp and reactive |
| Race | –3.3° to –3.5° | –2.7° to –2.9° | Smooth and stable |
More camber may help produce a glory lap.
Less camber may help produce a glory stint.
Camber Is Always a Compromise
Camber is not a magic setting.
It is geometry.
Every track contains different corner speeds, cambers, braking zones and load patterns. A setup that is ideal for one section may be less effective somewhere else.
The objective is to optimise the majority of the lap, not every individual corner.
Banked Corners
A banked corner supports the car and helps generate lateral grip.
Because the track surface already assists the outside tire, extreme negative camber may not be necessary.
The Nürburgring Karussell is an obvious example. The banking itself helps support the car.
Off-Camber Corners
An off-camber corner slopes away from the direction of the turn.
This reduces the support available from the road surface and increases the tendency of the car to slide outward.
No camber setting can completely remove that problem.
Too much negative camber may make the car even less stable if the tire is not being loaded in the way the setup expects.
Set camber for the majority of the circuit, not for one unusual corner.
Every adjustment gives grip somewhere and takes something away somewhere else.
The skill is deciding where the compromise matters least.
Track Shape and Side-to-Side Balance
Camber only produces its full benefit when the tire is under load.
On tracks with long straights, the tires may cool between corners. Extreme camber can become less useful because the tire spends more time travelling in a straight line with a reduced contact patch.
On these circuits, slightly less negative camber may improve braking, stability and temperature control.
Track direction also matters.
If a circuit contains more right-hand corners, the left-side tires normally carry more sustained load.
This can create different temperatures from one side of the car to the other.
A possible adjustment approach might be:
| Side | Condition | Possible Adjustment |
|---|---|---|
| More heavily loaded side | Inside edge excessively hot | Reduce negative camber slightly |
| Less heavily loaded side | Tire remains too cool | Adjust camber slightly toward a more usable contact patch |
Asymmetric setups can be useful, but they must be tested carefully.
A circuit may contain more corners in one direction while still placing the highest-load corner in the opposite direction. Simple corner counting is not enough.
Look at tire data and consider where the most important loads occur.
The Two-Horse Analogy
Imagine the car as a carriage pulled by two horses.
Each side of the axle has a different job during a corner.
In a left-hand turn, the car transfers weight toward the right-side tires. The outside tires must carry more load and keep the car on its intended path.
If the loaded tire has too little negative camber, it rolls onto its outside edge and loses contact.
If it has too much negative camber, it may work under heavy lateral load but become less stable during braking and acceleration.
Perfect camber is not one horse doing all the work.
It is both sides contributing in the correct way for the conditions.
The analogy is not technically perfect, but it helps explain the central idea:
Camber controls how the tire carries load.
Turning Setup Knowledge Into Driving Advantage
Camber is where setup knowledge begins influencing driving strategy.
Understanding your setup allows you to recognise where the car will be strong and where it will require more patience.
If your setup uses aggressive negative camber for high-load corners, the car may feel less stable in heavy braking zones or off-camber turns.
Instead of fighting the car, adapt your driving.
Brake slightly earlier.
Release the brake more smoothly.
Avoid sudden steering corrections.
Accept that the setup was designed to gain time elsewhere.
Later in the lap, where the road supports the car or the tires receive the correct load, you can use the advantage.
Carry more speed.
Commit to the corner.
Use the front grip the setup was designed to provide.
That is racecraft.
The setup does not need to be perfect everywhere. The driver needs to understand where it works.
Monza Example: Curva Alboreto and the First Chicane
Curva Alboreto places sustained load on the tires and leads onto the longest straight at Monza.
A camber setup that provides strong lateral grip may allow you to carry more speed through the corner and produce a better exit.
That extra speed continues along the straight.
By the time you reach the first chicane, you may be close enough to attack or force the car ahead to defend.
However, the first chicane also requires heavy braking and stability.
If the camber is too aggressive, the reduced straight-line contact patch may make the braking phase less predictable.
This demonstrates the compromise clearly.
More camber may improve Curva Alboreto.
Less camber may improve braking into the Rettifilo chicane.
The correct choice depends on which advantage produces the greatest benefit over the full lap and race distance.
It is not magic.
It is understanding where the setup creates time and where it asks for caution.
Setup is the tool.
Awareness is the weapon.
A Methodical Camber Testing Process
Use a consistent testing process rather than changing values randomly.
Step 1: Correct Tire Pressures
Complete several clean laps and make sure the hot pressures are within the correct working range for the current ACC tire model.
Do not evaluate camber while the pressures are still unstable.
Step 2: Record Temperatures
Observe the inside, middle and outside temperatures of all four tires.
Pay attention to differences between left and right sides.
Step 3: Identify the Driving Problem
Do not change camber simply because a number looks unusual.
Connect the data to a real handling issue:
- Mid-corner understeer
- Poor braking stability
- Weak corner exit
- Excessive rear movement
- Uneven tire wear
Step 4: Change One Axle at a Time
Adjust the front or rear camber in small steps.
A change of 0.1 or 0.2 degrees is often enough to produce a noticeable difference.
Step 5: Repeat the Same Test
Use the same fuel load, weather, track conditions and driving pace.
Complete several laps before comparing results.
Step 6: Judge the Entire Stint
Do not evaluate the setup only from the fastest lap.
Compare:
- Average lap time
- Tire temperatures
- Tire wear
- Braking stability
- Turn-in confidence
- Mid-corner balance
- Exit traction
The best setup is normally the one that remains predictable for the intended race distance.
Final Thoughts
I am still learning.
Much of this began as theory, but every test makes the relationship between setup and driving more visible.
The car becomes easier to understand.
The temperatures begin telling a story.
A handling problem stops feeling random and starts becoming something that can be identified, tested and improved.
That is what makes setup work so rewarding.
It is not simply about finding a faster number.
It is about discovering why the car behaves the way it does.
Start with tire pressure.
Read the temperatures.
Adjust camber in small steps.
Then test again.
The goal is not to copy someone else’s setup.
The goal is to understand your own car well enough to build one.
Together, we learn lap after lap.
Blue Dragon Racing
Leave a Reply